
Chapter 5 DevOps - The Basics
5.1 Background
So far we have only looked at Git in the context of local projects and command line software. This alone doesn’t make collaborating on code easy.
What is needed is a central platform where people can request for changes to be made to the code base and update their code based on changes by others.
This concept in Git is known as remotes or remote repositories. The following are examples of interactive services that allow you to manage Git projects effectively:
We are using Azure DevOps as this is the Department’s tool of choice for internal version control. We would use platforms such as GitHub for our more publicly facing projects (such as this book).
To work with internal DevOps Repos you will need an account with Basic access level. There is a form to sort out DevOps account levels and access on the IT service portal - search for DevOps. You will also need someone to give you permission to see the DevOps project that you’re working on. For information about how to do this, please read on. If you need a new project area on DevOps, use the same IT service portal form as above.
5.2 Theory
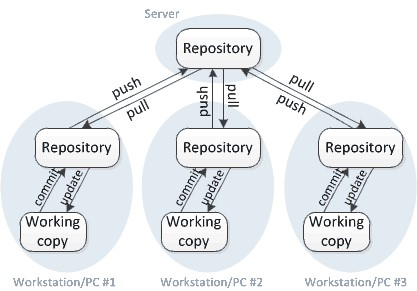
At a high level when you are using DevOps (or any type of remote) you are creating a central copy of your code on a server (the DevOps site).
The aim of any project is to get your final complete code on to the main branch of the server copy. Analysts will still make and run all their changes locally but will then use the concepts of pushing, pulling and pull requesting to get the DevOps version up to date.
Having this central repository and the approval processes that DevOps provides means that multiple analysts can work on a project at the same time and systematically merge all their changes into the final version after code review.
The following diagram illustrates the concept of server and local copies.
5.3 Getting a DevOps account
In order to use DevOps, you need an account with the right access levels. To get a DevOps account, you need to submit an Azure DevOps request on the service portal.
If you are requesting access to an existing area, you need to know the name and URL’s of the project you need access to. If you do not currently have an existing area and would like to create a new one, you can select ‘New project/sub-project’ in the ‘Request type’ dropdown rather than ‘New Account access to Azure DevOps’. Note that even if you need a new project creating, you will need to know which instance of Azure DevOps the project should live on.
The request must be approved by your line manager, and can take up to 5 days to be fulfilled. When submitting your request you will need to know the following:
Instance required: Different areas of the department use different instances and will be the first part of the URL for any projects in your area. Most areas use https://dfe-gov-uk.visualstudio.com/ and any new areas should be created using this instance, however there are other instances used throughout the department for historical reasons so be sure to check!
Do you have a Visual Studio Enterprise Subscription (Formerly MSDN)?: If you don’t know what this means, the answer is probably no!
The account level you require: If need access to see repositories, then you need a Basic account.
Project URL: Copy and paste the URL of the project you are requesting access to!
5.4 Creating a DevOps repository for a new project
To set up a repository on DevOps you need to:
- Open the DevOps website.
- Navigate to repositories.
- Find the current repository name at the top of page and click on it to bring up a dropdown menu.
- Click “add respository” and give it a suitable name.

This will create you a Git repo on DevOps. By default it will give you a main branch and a README file.
5.4.1 Clone to your computer
Cloning a repository means that you:
- Get a copy of it on your computer.
- Your computer stores where to find the online copy so it can talk to the online one when you ask it to.
To clone the blank repository to your computer you need to get the repo’s URL. It is easiest to do this by:
- Going to “Files” in the “Repos” section of DevOps.
- Ensuring you are in the right repository by checking the name in the banner at the top of the screen.
- Clicking the clone button in the top right-hand corner.
- Copying the URL.

Once you have copied the URL, you need to open git bash on your computer and clone the repository using the URL. When you open git bash you should do so in the folder where you want the repo to be. Ideally this will be on your C drive, outside of OneDrive or Teams, because git repositories don’t work well if OneDrive or Teams are syncing them. There is no need for the additional syncing from OneDrive or Teams because DevOps provides the online back-up that others can access. As long as you push your work regularly and at least once a day, DevOps provides the back-up and any general rules stating that work should be on OneDrive or Teams to be backed up do not apply.
Once you’ve got git bash open, the clone command will look as follows:
If you are working on EDAP, it is best to clone the repo to your P drive.
5.5 Creating a git repository for a project you’ve been doing on your computer
If you have already been working on a project locally you may wish to push this up and use this as the starting point for the collaborative workflow.
In this case, create a new repository on DevOps but before you click the “Create” button after giving your repository a name, untick the “Add a README” box. This will give a truly blank repository.
Once you click “Create” you will be take to a screen which says your new repository is empty. There will be an option to Push an existing repository from command line.
In order to Push an existing repository you need to do the following:
- Open Git Bash in your local Git repo
- Copy the code from the DevOps section and run it
This will set up the connection to DevOps and push an entire copy of the repo up to DevOps.
5.6 Adding users to a project
DevOps is a restriced access code environment where users need to first be given permission to access the site as a whole and then individual projects. This section assumes any users added have DevOps access at the Basic account level, as described earlier in this chapter.
To add users to a project:
- In the Overview section, go to the summary page
- Click on the invite button in the top, right hand corner
- Search for user
- Click Add
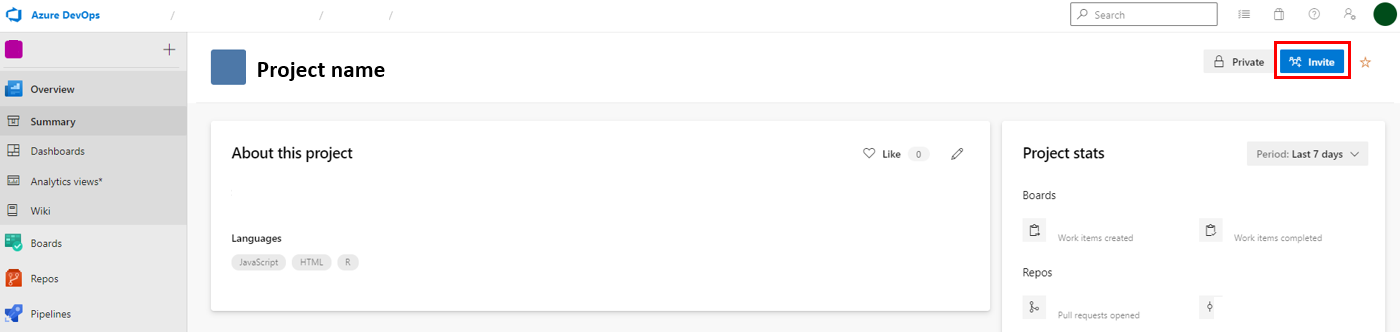
The user will then get a welcome email inviting them to the project.
5.7 Pull Requests
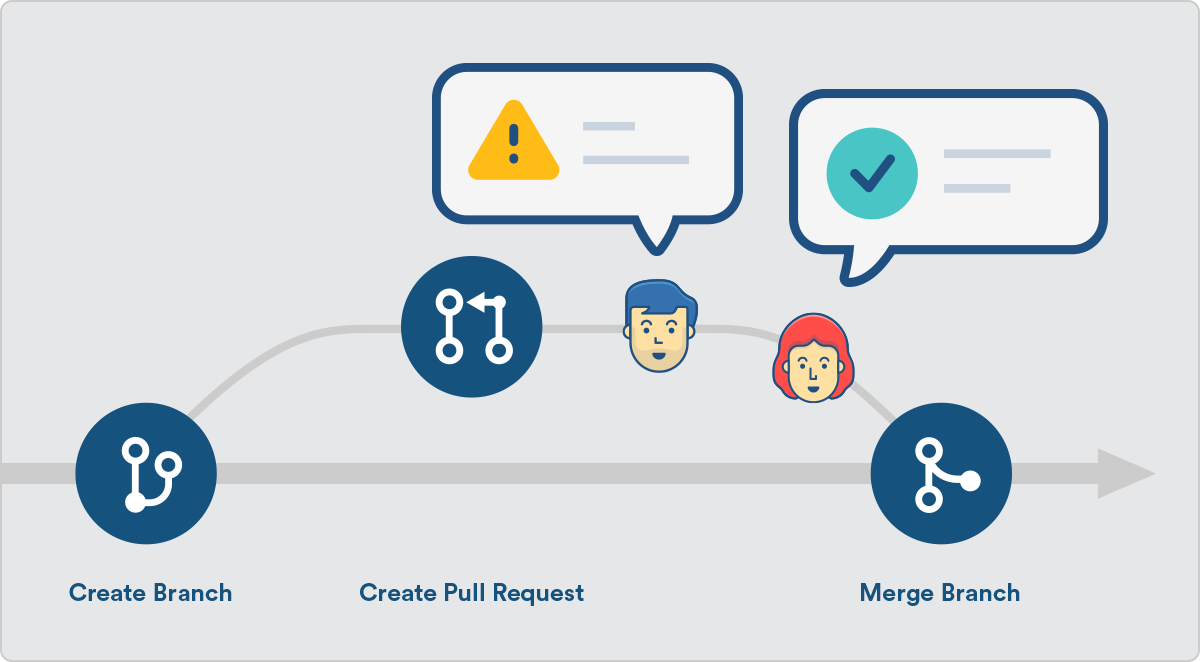
A pull request is a particularly useful bit of DevOps functionality when you are working with multiple branches. Pull requests facilitate code reviews and QA before your work is accepted into your main/master branch. You can access pull requests from the “pull requests” page under DevOps repos section.
A pull request allows a colleague to review your code before you merge it into another branch.
Often the branch you are merging your work into is the main/master branch but pull requests can be used on any pair of branches.
When you “complete” a pull request following a review, it uses the git merge command outlined in Chapter 2.
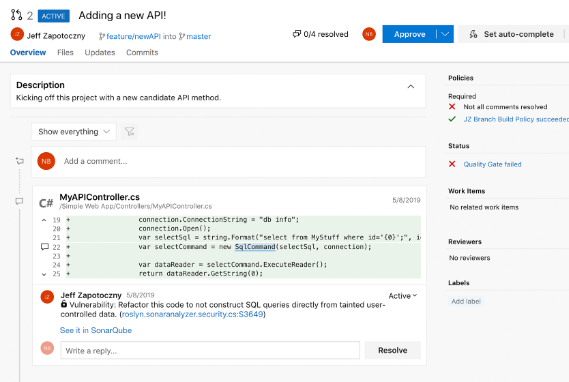
The visual interface allows you to:
- Give background to the changes made and link any work items
- Assign a colleague, or colleagues, to conduct a code review on the changes made
- Discuss the changes and resolve any requests for improvements
- Present the differences between the two branches in a visual manner (added/removed) so that you can easily see exactly what has been changed.
As a pull request ensures someone reviews your code before it is incorporated into the main/master branch it is a good tool for quality assurance. Having another person look over your code before it is accepted reduces the risk of errors being missed.
A good way of working involves ensuring all code written is reviewed via a pull request at some point. This ensures all code is checked and therefore has some QA. To facilitate this it is best to keep your main/master branch exclusively for work which has been through a pull request. Any new work should take place in a branch off your main/master branch and once complete you should always use a pull request to merge it into main/master. Pull requests are most successful when they contain a smaller number of changes because it is less likely the reviewer will miss something important.
If you are writing a pull request, it is a good idea to include:
- Why you were doing the work you’ve done.
- Any context to the assumptions you’ve made whilst doing the work.
- A list of specific points that you would like your reviewer to check. This should always include that the code is clear enough and whether it requires further comments.
Once you are happy with the code review that’s taken place in a pull request:
- The person reviewing it approves the request to mark that the review is finished.
- The person who wrote the code and set the pull request up “completes” it which performs the merge.
DevOps will delete the branch you were working in (the source branch) once you complete the pull request. This is good practice because it keeps the repo tidy. Deleting branches after you have merged the work elsewhere does not mean you lose work because all that work is on the branch you’ve merged to.
5.8 Branch Policies
At this point you will have a project that anyone who is a member of has the ability to push directly to the main/master branch.
Best practice ways of working include frequent code reviews via pull requests to support Quality Assurance. Pushing to main/master doesn’t allow this directly.
Instead what we do is set Branch Policies which force code to be reviewed in DevOps before it can be merged into main/master. If you set any branch policies, changes to main/master have to be made using a pull request.
5.8.1 How to set branch policies
To set branch policies:
- Go the the “Branches” page under repos in DevOps. Make sure you are looking at your intended repo by checking the centre top of the page.
- Hover your mouse over your main/master branch and click on the three vertical dots that appear at the right hand side of the screen.
- Click on “Branch policies” in the menu that appears.
5.8.2 The branch policy options
At the time of writing, branch policies offer four options:
- Require a minimum number of reviewers - how many people need to approve the code before it can be merged.
- Check for linked work items - Does the pull request need to have a work item linked (this is relevant if you are using the DevOps boards feature for work planning, otherwise you can ignore this)
- Check for comment resolution - Do all of the comments on the pull request need to be resolved before merging is approved
- Limit merge types - Do you want to enforce a merge strategy (see below for more information).
It is recommended that you enforce at least the first option.
When you start to feel confident with Git and DevOps, you may wish to think about limiting the merge types. If you limit merge types, you will get a cleaner commit history which is easier to interrogate.
The four options for merge types are:
- Basic merge (no fast-forward). This is the default and preserves your history exactly as it happened when you wrote your code.
- Squash merge. When you complete your pull request just a single commit is created on main/master containing all your work. This is a good approach for big projects where you don’t need to be able to see your intermediate steps. It is well suited to software development but may be less suitable for analytical work, especially if any of your code on intermediate steps (commits) was used to produce any form of outputs.
- Rebase and fast-forward. This gives your repo a linear history by reworking the commits covered by your pull request so they just cover additional work needed on top of the current state of main/master.
- Rebase with merge commit. This is like option 3 but it adds an additional commit which records a pull request has been completed. If you are using pull requests to support QA, this is probably a good thing because it ensures the use of a pull request is logged in your version history.