
Chapter 4 Version Control Using Git - The Basics
4.1 Background
Git is a program used to version control your files - it can be used for any files, but works best for flat text files (anything that you can open in Notepad that will show actual text - .txt, .csv, .sql, .R, .Rmd etc.) instead of binary files (anything that shows gibberish when opened in Notepad - .docx, .xlsx etc.).
There are many ways to use Git, but they fall into two main categories, command line and graphical user interface (GUI). Command line interfaces of Git look like the Windows Command Prompt (or Terminal on Mac). By default the Git installation includes a command line interface called Git BASH that you can use Git from. BASH is a command line interface originally for Unix based operating systems that uses a slightly different syntax to the Windows Command Prompt.
Once installed, you can also use Git from Command Prompt or Powershell, but Git BASH has a helpful colour scheme that highlights important Git features and more intuitive commands.
If you would prefer to use a GUI you can choose to install one when installing Git. You can also use RStudio, Sourcetree or a whole host of other GUIs with Git. GUIs can be used by pointing and clicking, whereas the command line involves memorising some commands. Despite this, this tutorial will use the command line - Git BASH specifically. This is because the command line is the most versatile interface (it will get you out of trouble when things mess up!) and, once you learn the command line, you’ll be able to apply your skills to any GUI pretty easily.
There’s some specific guidance on using RStudio to manage your git repositories further down in this chapter.
4.2 Installing Git
You can download Git from here https://git-scm.com/downloads by clicking on your operating system of choice. Once downloaded, open up the installer and follow it through - the default settings should be fine.
4.3 Opening Git BASH
You can open up Git BASH from File Explorer by right clicking in a folder and clicking “Git Bash Here”. This will open up a black command window with coloured text. The folder you opened Git BASH in will appear in first line of text - this is the folder that Git is “pointed” at.
You run commands in Git BASH by typing them in and pressing enter.
4.4 Setting up Git
When you first install Git it is advised to perform some set up steps - they aren’t necessary, but will be useful.
First of all type
and then
This will add your name and email to each commit you make, which will prove useful when collaborating.
You can also set the default text editor to Notepad by copying in
Or, if you have Notepad++ installed you could use that instead by copying in
git config --global core.editor "'C:/Program Files (x86)/Notepad++/notepad++.exe' -multiInst -notabbar -nosession -noPlugin"Note, Ctrl+C and Ctrl+V don’t work for copy/pasting in Git BASH, but you can still right click to copy/paste.
4.6 Setting up a Git repository
A Git repository is simply a folder that Git is tracking the changes in - it looks just like any other folder in File Explorer, but in Git BASH there will be some text after the file path. Open Git in a folder you would like to make a project in.
Next type:
This will turn this normal folder into a Git Repository - some text saying “master” will appear after the file path. This folder is now ready to start a version controlled project!
4.7 Applying Git to a Project
Let’s make a toy R project that we can version control. Make an R project in the same folder as the Git repository from above. The folder will now have an .Rproj file and a .gitignore file (we’ll get to this later).
Let’s create some code to plot the stopping distance of cars at different speeds - this data is pre-installed in a data set called “cars”.
The code should look something like this:
library(ggplot2)

data <- cars

cars_plot <- ggplot(data,
  aes(x = speed, y = dist)) +
  geom_point()

cars_plot
This will make a simple scatter plot (and hopefully convince you not to speed…). This seems like a good place to record our progress: save your file as “speed_dist.R” in your project folder. Now we can use Git to take a record of this save in case we need it in the future.
4.8 Adding and committing files
In Git BASH type
This tells Git that we want to record the changes to the folder. We could type all the file names that we want to keep track of, but the dot after add adds everything.
Using git add .
Be really careful using git add ., particularly if you’re working with sensitive data as you could accidentally upload this to Azure DevOps. To get around this, make sure you have a .gitignore file (explained below) set up before using git add . or add files individually.
Next we actually commit the change:
Here -m means we want to add a comment and "Added speed_dist.R" is our comment to tell us what the commit involved - you could write anything you wanted for the comment.
Let’s make a change to the code. Add
to the end of your code in speed_dist.R. When run, this will save your plot as cars_plot.png in your project folder.
Let’s use Git to record these changes. First type
this will show us all the files that have changed, or been created since your last commit. It should say that speed_dist.R has been modified and cars_plot.png is “untracked”.
As mentioned earlier, Git deals best with flat text files, of which a .png file is not. Because of this, we won’t tell Git about the .png file, only the changes to the speed_dist.R code. This is okay though, because so long as we have the code we can always recreate the image.
Use
to add just speed_dist.R (notice how last time we used git add . to add everything, but explicitly named the file here as we don’t want to add the .png file).
As before we want to commit these changes:
The workflow for making changes is as follows:
Change your files
Save your files
Add the files you changed in Git
Commit the changes in Git
4.9 Viewing the history
So far we’ve made two commits. These commits start building up a history in Git. We can view a log of this history using:
It will show the date, time, commit message, author and hash for each commit made.
4.10 Making branches
There may come times when you are working to make two (or more) sets of code changes at the same time. To make sure that you don’t get confused about which change you are making Git has a feature called branches. Branches are also very useful when collaborating with others, when multiple people are making changes at once.
Let’s say we want to make two changes at once to the code above:
Currently the speed is in mph and the distance in feet. Let’s change it to kmph and meters.
Let’s add some labels to the axes on the plot and a title.
We could just make these changes one at a time as before, but if we want someone to review just one change at a time it’s easier if we use branches.
So far we’ve just been working on the “master” branch, which you can think of as more of a trunk than a branch, it’s what we’d regard of as the most up to date and complete version of the code. Let’s make a new branch for our unit conversion work.
“master” branch vs “main” branch
We have just referred to the “master” branch. Whilst this is still the git default, conventions are moving towards use of “main” branch instead of “master” branch.
This guide will refer to the “master” branch for specific examples where consistency with the git default is important and the “main” branch in other circumstances. Note the two terms refer to the same thing but they are not interchangeable. A project will have either a main or a master branch, depending on how it was set-up, but not both. You should work out which yours has and use that in place of main/master for all examples in this book.
To create a new branch type in
We can type git branch again to see all the available branches. There should now be two, “master” and “unit_conversion”.
To switch branches type:
The text after the filepath in Git BASH should now say “unit_conversion”.
Here we can make changes for converting units and commit them without changing the master branch.
After the line
copy in the following code:
# convert speed to kmph
data$speed <- data$speed*1.609344

# convert distance to meters
data$dist <- data$dist*0.3048
We can now add and commit these changes as before.
Use
to see the log with these new changes.
Let’s switch back to the master branch:
and look at the log
Our unit_conversion changes aren’t there! Don’t worry this is what we want - we’ll come back to this later.
For now, let’s make a new branch for the plot labels.
After the geom_point() line add
  + labs(x = "Speed (mph)",
       y = "Stopping Distance (m)",
       title = "Stopping distance against speed") +
       theme_minimal()
and add and commit these changes (remember, only add speed_dist.R!).
We now have two separate branches with different changes. We could ask people to review each of these separate branches individually.
4.11 Merging branches
Once someone has QA’d our code we can merge our branches into the master branch. We can do this on Azure DevOps or in Git BASH. We’ll explain how to do this in Git BASH below.
Checkout the master branch. Merge the branches one at a time like this
If we look at the log all the changes from both of these branches should be visible.
Note, your log might be getting long enough to run off the page. If so you can go up and down the log with the arrow keys and pressing “q” will allow to you begin typing again.
You can now delete the other branches.
4.12 Branching Workflow
The branching workflow goes like this:
For each large scale change make a branch
Checkout the branch
Change/save/add/commit as usual
Checkout the master branch
Merge changes from working branch into master branch
Delete the working branch
Start all over again for the next change
4.13 Merge conflicts
Sometimes, after trying to merge two branches Git will say there are “merge conflicts”. This means that both branches changed the same line of code and Git doesn’t know which one to keep.
To understand how to handle merge conflicts we’ll create one!
Make a new branch called “blue_is_great” and another called “red_is_great”.
Checkout out the “blue_is_great” branch and change the line with geom_point() in to
Save, add and commit these changes.
Checkout the “red_is_great” branch and change the same line to
Save, add and commit these changes.
Let’s try to merge these into the master branch
So far so good.
You’ll get some kind of error. Something along the lines of CONFLICT... automatic merge failed... and the branch text will say master|MERGING.
If we open speed_dist.R there’ll be a line saying <<<<<<< HEAD then one version of our changed line then a bunch of equals after which we’ll see the other version of our line and then >>>>>>> blue_is_great.
Thankfully, when Git finds a merge conflict it keeps both versions of the line in question so we can decide which one is right.
Suppose we decide that red is better than blue for this. Let’s therefore get rid of the line that makes the colour blue and all the other extraneous lines.
Now we do the usual git add and git commit. Make note of the merge conflict in the commit message, something like “Fixed merge conflict between blue and red”.
For very large and complex merge conflicts it’s worth searching for < HEAD to find all the instances of a conflict.
4.14 .gitignore
As the number of files in our project increases it will become tiresome typing in each file we would like to track.
We could just use
but that would include files that we don’t want to track (like the .png we saved). The .gitignore file is a list of files that Git will ignore (hence the name), no matter how they change, allowing us to use git add . without worrying about files we don’t want to add.
As mentioned earlier, a .gitignore file was created with our R Project. You can view this file in any text editor (including RStudio) and, if you do, you will see something like this:
.Rproj.user
.Rhistory
.RData
.Ruserdata
These are files that RStudio creates that are of little interest in the long run - they change very frequently and aren’t necessary for someone else to run your code.
Let’s add to this to tell Git to ignore the image we saved earlier. There are a few ways to do this:
We could list the file exactly as it is: car_plot.png
We could use a wildcard for the file name so all .png files are ignored: *.png
Using the second method will be more robust in the long run because we won’t need to update it if new images are added.
Add a new line to .gitignore that says “*.png” and save it.
In Git BASH, typing
will no longer show the image!
In non-R projects you can create your own .gitignore file in a text editor and save it in your project folder.
4.15 Working with git in RStudio
4.15.1 Overview
Within RStudio, you can choose to manage your repository using the git bash terminal as in the previous sections, use the RStudio GUI (graphical user interface) elements or use a combination of both. Below we highlight the key things you need to know to get going with a git repository within R.
4.15.2 Initial set-up
RStudio needs a few small bits of set-up to be able to access git. The first step is to let it know where the git executable can be found.
Using the menu bar in RStudio, go to Tools > Global options... You should see the window below pop up, where you can select Git/SVN.
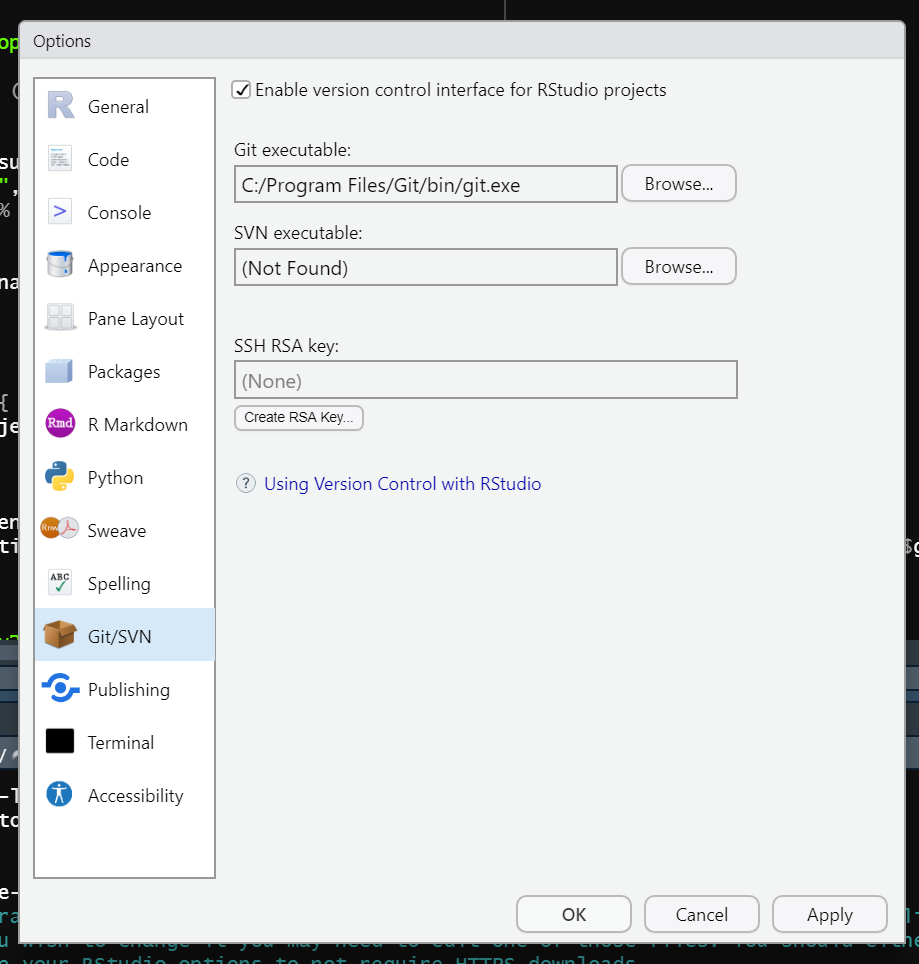
Assuming it’s not entered already, you’ll need to provide the location where the Git executable is installed. It will be called git.exe and the likely location is:
C:/Program Files/Git/bin/git.exe
Whilst you’ve got the Global options open, another useful option to set is the default terminal to use in RStudio. The default is the Windows Command Prompt, but Git BASH is generally easier to use. To update this, keep Global options open and select the Terminal options panel just below Git/SVN.
Here you’ll see an option labeled New terminals open with:. If it isn’t already set to Git Bash, we recommend changing it to that, even if you’re primarily planning on using the RStudio git GUI.
4.15.3 Cloning an existing project
The easiest way to get set up with a repository in RStudio is to use the New Project... option under File in the menu bar. When you select New Project..., you’ll then see three options: New directory, Existing directory and Version control. Assuming you’ve already got your repository set up on Dev Ops or GitHub, select Version control and then Git on the next panel that comes up. Once you’ve done that, you’ll see the options below.
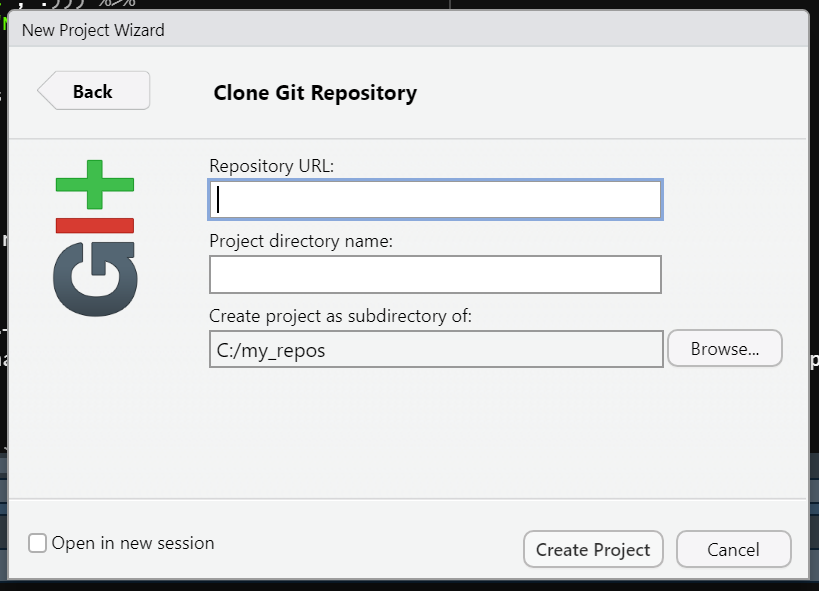
Here you can enter your existing Repository URL and choose a root directory for where to keep it locally. The Project directory name option will be auto-filled once you provide a Repository URL. For the root directory where the repository directory will be cloned, we recommend not using your standard One Drive folder system as this can cause issues if both One Drive and git are trying to manage file changes. Instead it’s best to navigate either to C:\ or C:\Users\<username>\ and create a suitable root folder (e.g. my_repos) to store your repositories in (and pinning this folder to Quick access in File Explorer can help with finding your repository directories and files quickly in Windows).
Once you’ve entered your repository URL and chosen a directory in which to clone your repository, click Create Project and RStudio will do the rest.
4.15.4 Overview of the RStudio git GUIs
There are three key areas within RStudio for accessing git functionality. The Git Pane, the terminal and the RStudio menu bar.
4.15.4.1 Terminal (Git BASH)
The terminal offers all the Git BASH command line functionality already described. It can be accessed via the terminal pane usually found next to the R console pane.
4.15.4.2 Git pane
The Git pane offers an excellent quick look at the status of your repository, whilst offering quick links for viewing or committing changes, pulling and pushing, viewing the history, accessing the project settings, and creating and switching branches. Effectively all the common things you need to do with Git. The image below shows the git pane opened for a local clone of the repo for this guidance. It consists of it’s own menu bar with buttons for each of the options listed above, alongside a preview pane showing any files that have been modified, added or removed since your last commit. The Staged column shows whether a given file has been added or staged ready for a commit and the status column shows whether a file has been added (A), modified (M) or removed (R) since the last commit.

The elements in the git pane menu bar offer the following options:
 Open the RStudio review changes window;
 Also opens the RStudio review changes window;
 Perform a pull;
 Push the current commits;
 Open the RStudio review changes window, defaulting to the History panel;
 Open the project settings window - this provides the option to undo any file saves since the last commit if you want to undo any recent changes (equivelant to running git restore);
 Create a new branch;
 Shows the current branch and allows the user to switch branches via the drop down list;
 Refresh the git pane preview.
4.15.4.3 Menu bar access
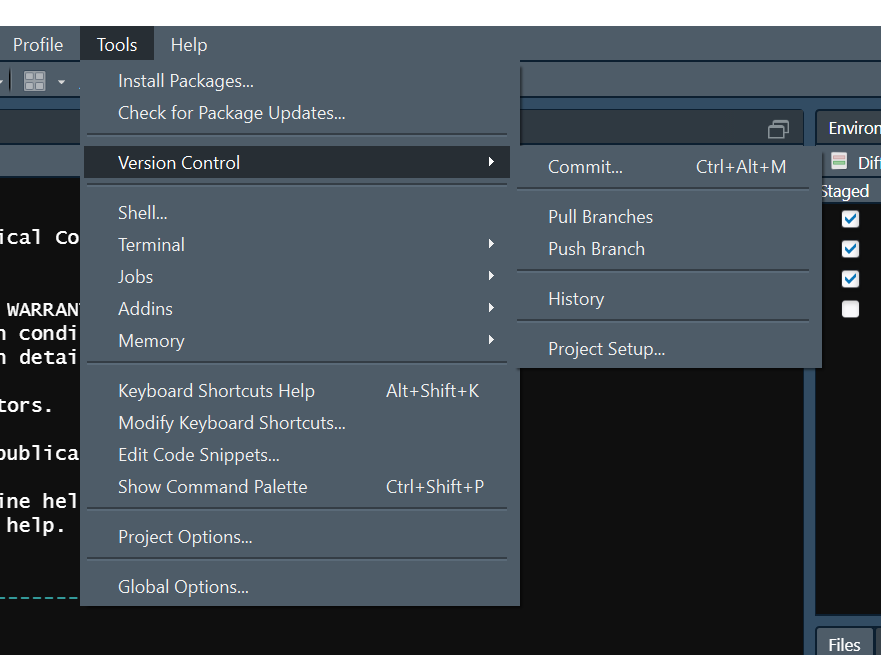
To access the git functionality via the menu bar, navigate to Tools > Version control. You should then see the options Commit..., Pull Branches, Push Branch, History and Project Setup...
4.15.4.4 Branches, committing and pushing
The bulk of any adding, committing and pushing activities using the RStudio GUI is done using the Review changes window. This can be opened either by selecting File > Commit... from the RStudio menu bar, or clicking Diff, Commit or ![]() in the RStudio git pane.
in the RStudio git pane.
The Review Changes window consists of 3 panes, the top left shows a preview of all files that have been added, modified or deleted, the top right pane allows you to add a commit message and the last pane shows the git diff result for any file selected in the file preview pane.
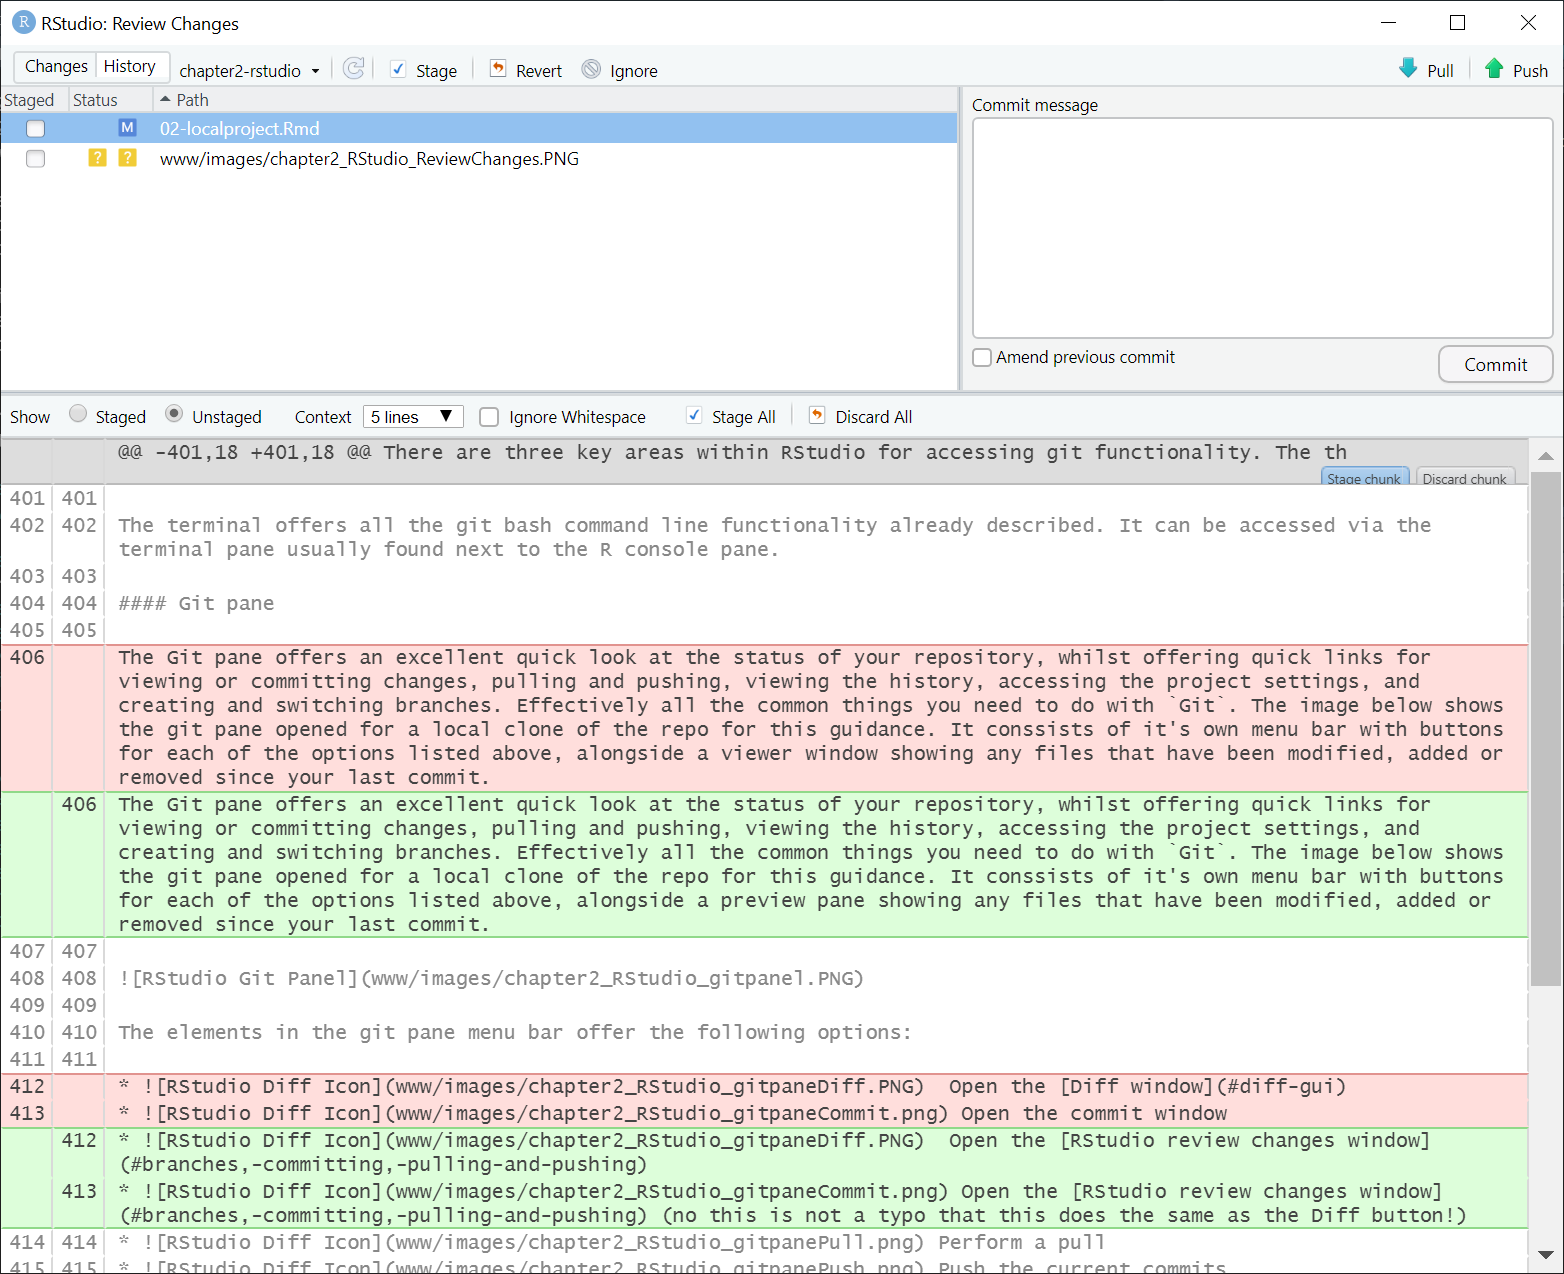
To make a commit, review the changes in the diff pane by selecting each file in turn and click the Stage button in the Review changes menu bar (either with multiple/all files selected at once or each file selected individually). Then add your commit message and click the Commit button below the Commit message entry box.
Then you can then just click the Push button above the commit message entry box to sync your changes to the remote repository.
Also in the review changes window, you can restore a file to its state at the last commit made (i.e. undo any saved edits since your last commit). Simply select the file(s) you wish to restore and click the revert button. Note that this is equivalent to the command git restore and not git revert.
You can switch branches by clicking on the current branch name in the Review changes menu bar, i.e. next to the History button.
4.15.5 Summary
Overall, RStudio provides some useful GUI-based tools for performing the basic git version control tasks: creating and switching branches, add, commit, push and pull, restore and diff. What it won’t allow you to do are actions around merging branches or reverting to previous commits. For these, you’ll need to use either the git commands in a bash terminal or the features provided by the online platforms Dev Ops or GitHub (depending on which one you’re using with your project).