Scripting Databricks workflows
Please be aware that the Databricks platform is regularly updated and may look different from the guidance included on this site. If you notice any discrepancies between the content on this site and the Databricks platform, please let us know by contacting statistics.development@education.gov.uk.
Workflows can be constructed through the Databricks workflows user interface (UI), however for large or complex workflows the UI can be a time-consuming way to build a workflow. In these scenarios it is quicker and more in-line with RAP principles to script your workflow.
Scripting a workflow means using code to define, control and automate the sequence of data processing steps, rather than configuring those steps manually using the UI.
For a workflow to be built there must be scripts, queries or notebooks available to read by Databricks either in your workspace or in a remote Git repository.
This page presents how to script a workflow to run notebooks saved in your Databricks workspace, both using an R script in an IDE (e.g. RStudio, Positron) and by creating another Databricks notebook, and how to set it up to send email notifications when the workflow successfully completes.
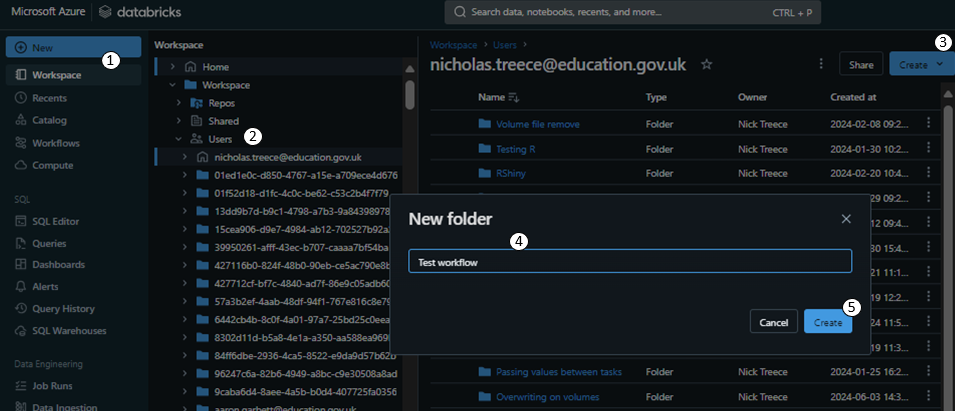
Create a folder in your Databricks workspace to store your workflow notebooks. First click ‘Workspace’ in the sidebar (1), then navigate to your user folder (2). Then click the blue ‘Create’ button (3) and select ‘Folder’. Give the folder a name (4) such as ‘Test workflow’ and then click the blue ‘Create’ button (5).
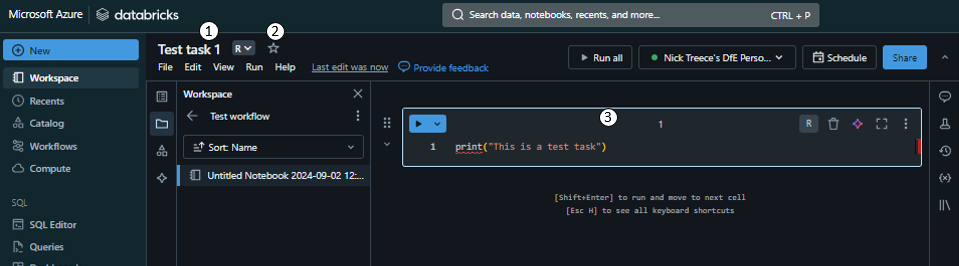
In your new folder click the blue ‘Create’ button again, this time choosing ‘Notebook’. Rename your new notebook’s title to ‘Test task 1’ (1), and set the default language to R (2). Then in the first code chunk write
print("This is a test task")(3).
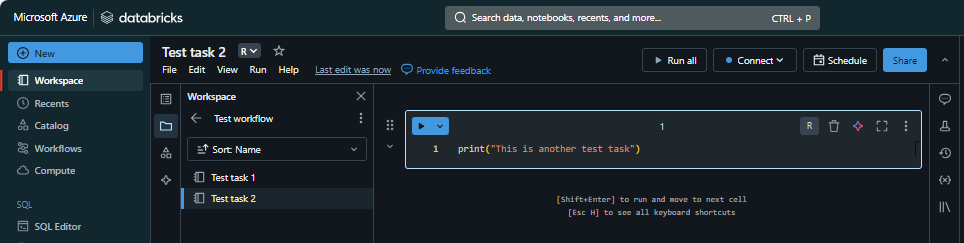
Create a second notebook in the same folder titled ‘Test task 2’, and in the first code chunk write
print("This is another test task").
Create a new R script in your IDE and load the
tidyversepackage. Install thedevtoolspackage if it isn’t already installed and use thedevtools::install_github()function to install thedatabrickspackage. Load the newly installeddatabrickspackage.library(tidyverse) if(!"devtools" %in% installed.packages()){ install.packages("devtools") } devtools::install_github("databrickslabs/databricks-sdk-r") library(databricks)Use the
usethis::edit_r_environ()function to edit your R environment variables stored in the.Renvironfile. If it doesn’t already exist create a variable calledDATABRICKS_TOKENand paste in your Databricks access token. Save the.Renvironfile and close it. You’ll then need to restart your session so that the environment variables update.DATABRICKS_TOKEN = <your access token>NoteDatabricks access tokenA Personal Authentication Token (PAT) is a unique code that is generated to let Databricks know who is accessing it. It functions as a password and so must not be shared with anyone.
If you haven’t already generated a Databricks token you can find instructions on how to do so in the Setup Databricks personal compute cluster with RStudio article.
ImportantDon’t put your token into the codeWe use the
.Renvironfile to specify our PAT to ensure we don’t expose it. If it were coded in the script then anyone with access to the script would be able to use it to emulate our Databricks access permissions.We can now connect to the API with the
databrickspackage using thedatabricks::DatabricksClient()function. It requires thehostwhich is the URL of the Databricks platform up until (and including) the first/, and your token. We’ll store the result in a variable calledclientas we need to pass this to the other functions in thedatabrickslibrary.
We can then use thedatabricks::clustersList()function to fetch a list of the clusters, which we can view usingView().host <- "https://adb-5037484389568426.6.azuredatabricks.net/" api_token <- dbutils.widgets.get("api_token") client <- databricks::DatabricksClient(host = host, token = api_token) clusters <- databricks::clustersList(client) View(clusters %>% select(cluster_id, creator_user_name, cluster_name, spark_version, cluster_cores, cluster_memory_mb) )NoteClustersThe
databricks::clustersList()function will return any clusters that you have permission to see.The data returned by the function is hierarchical, and a single ‘column’ may contain several other columns. The
View()function renders a table and as a result flattens the structure. To see how it is originally structured you can runstr(databricks::clustersList(client)).Make a note of your cluster ID and save it in a variable called
cluster_id. You could automate this step by filtering theclustersdata frame as long as you ensure that it only results in a singlecluster_id.cluster_id <- "<your cluster id>"We can now start creating some parameters for the job. Firstly we’ll need a
job_name, and the paths to the notebooks we’re wanting to include in the workflow. We’ll also need to create a uniquetask_keyfor each of the notebook tasks we’re going to set up.job_name <- "test job" first_notebook_path <- "/Users/<user folder>/Test workflow/Test Notebook" second_notebook_path <- "/Users/<user folder>/Test workflow/Test Notebook 2" task_key_1 <- "test_key" task_key_2 <- "test_key_2"We can then define the tasks as lists. There are many options available when creating a task, a full list of which can be found in the tasks section of the job API documentation. When reading this documentation any parameter that is marked as an object needs to be passed as a list (
list()) in R, and anything marked as an array should be passed as a vector (c()).For the first task we’ll give it the first
task_keywe created above, and tell it to run on our existing cluster by passing the ID of our cluster toexisting_cluster_id. We’ll then specify that it is anotebook_taskand pass that a list with thenotebook_pathand thesourcewhich we will set toWORKSPACE(as opposed to a remote Git repository) for the purposes of this example.first_job_task <- list( task_key = task_key_1, existing_cluster_id = cluster_id, notebook_task = list( notebook_path = first_notebook_path, source = "WORKSPACE" ) )For the second task we will do the same, but using the second
task_keyandnotebook_pathwe defined. In addition, we’ll also add adepends_onclause with the previoustask_key(passed in a list), and specify it is only torun_ifALL_SUCCESS. This means that the second task won’t begin processing unless all of the tasks itdepends_onhave completed successfully.second_job_task <- list( task_key = task_key_2, existing_cluster_id = cluster_id, notebook_task = list( notebook_path = second_notebook_path, source = "WORKSPACE" ), depends_on = list(task_key = task_key_1), run_if = "ALL_SUCCESS" )Now we have both of our tasks defined we can create the job using the
databricks::jobsCreate()function. We pass it theclientas the first argument, then the jobnamewe defined. Thetasksare passed as a list which contains each of the task lists we built above.
We’ll also tell it to send usemail_notificationsby passing a list with anon_successvalue of email addresses.
The function returns the ID of the job we just created, so we will want to store the response in a variable calledworkflowso we can refer to it later.workflow <- jobsCreate(client, name = job_name, tasks = list(first_job_task, #list second_job_task), #list email_notifications = list( on_success = c("your-email") ) )We can now get the ID of the job that was created and tell the API to run the job. We’ll store the
job_idfrom theworkflowvariable above. We’ll then use thedatabricks::jobsRunNow()function to tell it to run the workflow we just created by passing it thejob_idwe just stored. We’ll also store thejob_run_idreturned by thedatabricks::jobsRunNow()function.job_id <- workflow$job_id job_run <- jobsRunNow(client, job_id = job_id) job_run_id <- job_run$run_idWe will now use this to create links to the job and the specific run of the job we just set off.
Define a
job_linkusing thepaste0()function with thehostvariable we passed to thedatabricks::DatabricksClient()function earlier, followed by"job/"and thejob_iddefined above.
We can then create ajob_run_linkby combining thejob_link,"/runs/"and thejob_run_idfrom the previous step.
We can then output thejob_linkas text.job_link <- paste0(host,"jobs/",job_id) job_run_link <- paste0(job_link,"/runs/", job_run_id) job_linkYou’ve now created a workflow with code, and each time you re-run this script a new workflow with the same name will be created. If you run it multiple times you will end up with several instances of ‘test job’ listed under your name on the
Workflowspage in Databricks.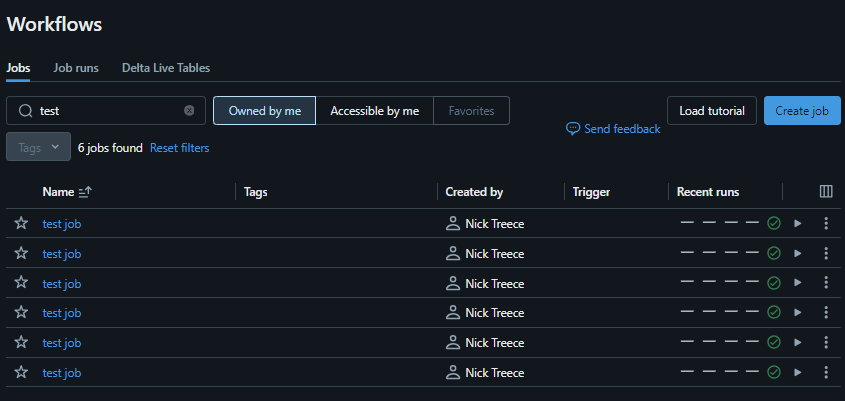
You can use the
databricks::jobsDelete()function with theclient, andjob_idvariables from above to clean up each of these individually. Alternatively you could use a for loop to remove all at once without having to manually click through the UI process for each. To do this, call thedatabricks::jobsList()function, passing it theclientvariable, and specifying thenameof the jobs you want to list. Then filter the list to just the jobs with acreator_user_namematching your user name.my_jobs <- jobsList(client, name = "test job") %>% filter(creator_user_name == '<your user name>') View( my_jobs %>% select(job_id, creator_user_name, run_as_user_name, created_time) ) for(job_id in my_jobs$job_id){ jobsDelete(client, job_id) }
Create a folder in your Databricks workspace to store your workflow notebooks. First click ‘Workspace’ in the sidebar (1), then navigate to your user folder (2). Then click the blue ‘Create’ button (3) and select ‘Folder’. Give the folder a name (4) such as ‘Test workflow’ and then click the blue ‘Create’ button (5).
In your new folder click the blue ‘Create’ button again, this time choosing ‘Notebook’. Rename your new notebook’s title to ‘Test task 1’ (1), and set the default language to R (2). Then in the first code chunk write
print("This is a test task")(3).
Create a second notebook in the same folder titled ‘Test task 2’, and in the first code chunk write
print("This is another test task").
Create a third notebook and title it ‘Create and run job’. Create a cell in this notebook to load the
tidyversepackage. Install thedevtoolspackage and load it, then use itsinstall_github()function to install thedatabrickspackage. Load the newly installeddatabrickspackage.
    library(tidyverse)

    install.packages("devtools")
    library(devtools)

    install_github("databrickslabs/databricks-sdk-r")
    library(databricks)
Create a new code chunk and create a text widget to contain your Databricks access token. Run this cell to create the widget at the top of the page. Once the widget is there add in your access token into the text box.
dbutils.widgets.text("api_token", "")NoteDatabricks access tokenA Personal Authentication Token (PAT) is a unique code that is generated to let Databricks know who is accessing it. It functions as a password and so must not be shared with anyone.
If you haven’t already generated a Databricks token you can find instructions on how to do so in the Setup Databricks personal compute cluster with RStudio article.
ImportantDon’t put your token into the codeWe use a text widget to specify our PAT to ensure we don’t expose it. If it were coded in the notebook then anyone with access to the notebook would be able to use it to emulate our Databricks access permissions.
We can now connect to the API with the
databrickspackage using thedatabricks::DatabricksClient()function. It requires thehostwhich is the URL of the Databricks platform up until (and including) the first/, and your token. We’ll store the result in a variable calledclientas we need to pass this to the other functions in thedatabrickslibrary.
We can then use thedatabricks::clustersList()function to fetch a list of the clusters, which we can view usingView().host <- "https://adb-5037484389568426.6.azuredatabricks.net/" api_token <- dbutils.widgets.get("api_token") client <- databricks::DatabricksClient(host = host, token = api_token) clusters <- databricks::clustersList(client) View(clusters %>% select(cluster_id, creator_user_name, cluster_name, spark_version, cluster_cores, cluster_memory_mb) ) NoteClusters
The
databricks::clustersList()function will return any clusters that you have permission to see.The data returned by the function is hierarchical, and a single ‘column’ may contain several other columns. As the
display()function renders a table, you’ll have to select only columns thatdisplay()knows how to show. Generally, the columns that are at the left-most position when you runstr(databricks::clustersList(client))(shows the structure).Make a note of your cluster ID and save it in a variable called
cluster_id. You could automate this step by filtering theclustersdata frame as long as you ensure that it only results in a singlecluster_id.cluster_id <- "<your cluster id>"Create a new code block to define some parameters for the job. Firstly we’ll need a
job_name, and the paths to the notebooks we’re wanting to include in the workflow. We’ll also need to create a uniquetask_keyfor each of the notebook tasks we’re going to set up.job_name <- "test job" first_notebook_path <- "/Users/<user folder>/Test workflow/Test Notebook" second_notebook_path <- "/Users/<user folder>/Test workflow/Test Notebook 2" task_key_1 <- "test_key" task_key_2 <- "test_key_2"We can then define the tasks as lists. There are many options available when creating a task, a full list of which can be found in the tasks section of the job API documentation. When reading this documentation any parameter that is marked as an object needs to be passed as a list (
list()) in R, and anything marked as an array should be passed as a vector (c()).For the first task we’ll give it the first
task_keywe created above, and tell it to run on our existing cluster by passing the ID of our cluster toexisting_cluster_id. We’ll then specify that it is anotebook_taskand pass that a list with thenotebook_pathand thesourcewhich we will set toWORKSPACE(as opposed to a Git repository) for the purposes of this example.first_job_task <- list( task_key = task_key_1, existing_cluster_id = cluster_id, notebook_task = list( notebook_path = first_notebook_path, source = "WORKSPACE" ) )For the second task we will do the same, but using the second
task_keyandnotebook_pathwe defined. In addition, we’ll also add adepends_onclause with the previoustask_key(passed in a list), and specify it is only torun_ifALL_SUCCESS. This means that the second task won’t begin processing unless all of the tasks itdepends_onhave completed successfully.second_job_task <- list( task_key = task_key_2, existing_cluster_id = cluster_id, notebook_task = list( notebook_path = second_notebook_path, source = "WORKSPACE" ), depends_on = list(task_key = task_key_1), run_if = "ALL_SUCCESS" )Now we have both of our tasks defined we can create the job using the
databricks::jobsCreate()function. We pass it theclientas the first argument, then the jobnamewe defined. Thetasksare passed as a list which contains each of the task lists we built above.
We’ll also tell it to send usemail_notificationsby passing a list with anon_successvalue of email addresses.
The function returns the ID of the job we just created, so we will want to store the response in a variable calledworkflowso we can refer to it later.workflow <- jobsCreate(client, name = job_name, tasks = list(first_job_task, #list second_job_task), #list email_notifications = list( on_success = c("your-email") ) )We can now get the ID of the job that was created and tell the API to run the job. We’ll store the
job_idfrom theworkflowvariable above. We’ll then use thedatabricks::jobsRunNow()function to tell it to run the workflow we just created by passing it thejob_idwe just stored. We’ll also store thejob_run_idreturned by thedatabricks::jobsRunNow()function.job_id <- workflow$job_id job_run <- jobsRunNow(client, job_id = job_id) job_run_id <- job_run$run_idWe will now use this to create links to the job and the specific run of the job we just set off.
Define a
job_linkusing thepaste0()function with thehostvariable we passed to thedatabricks::DatabricksClient()function earlier, followed by"job/"and thejob_iddefined above.
We can then create ajob_run_linkby combining thejob_link,"/runs/"and thejob_run_idfrom the previous step.
We can then output thejob_linkas text.job_link <- paste0(host,"jobs/",job_id) job_run_link <- paste0(job_link,"/runs/", job_run_id) job_linkIn a new cell, output the
job_run_link. NoteOutput limits on Databricks code chunks
Each chunk will display an output (assuming there are any) underneath the chunk once it has been run. Each chunk is limited to a single output though, which defaults to the last output generated.
So if we had written a cell to output both links at the same time, we would still only see the
job_run_link.
Now click on the links and check they work.
You’ve now created a workflow with code, and each time you re-run this script a new workflow with the same name will be created. If you run it multiple times you will end up with several instances of ‘test job’ listed under your name on the
Workflowspage in Databricks.You can use the
databricks::jobsDelete()function with theclient, andjob_idvariables from above to clean up each of these individually. Alternatively you could use a for loop to remove all at once without having to manually click through the UI process for each. To do this, call thedatabricks::jobsList()function, passing it theclientvariable, and specifying thenameof the jobs you want to list. Then filter the list to just the jobs with acreator_user_namematching your user name.my_jobs <- jobsList(client, name = "test job") %>% filter(creator_user_name == '<your user name>') display( my_jobs %>% select(job_id, creator_user_name, run_as_user_name, created_time) ) for(job_id in my_jobs$job_id){ jobsDelete(client, job_id) }